With just five ingredients and a whole lot of flavor, Chili Cheese Dip is a guaranteed hit for parties, potlucks, or a cozy night in.

A great dip doesn’t need to be fussy, and chili cheese dip proves it. While it’s sometimes confused with chili con queso, the two dips have their differences. Chili cheese dip is heartier, thanks to the addition of chili and cheddar cheese, while chili con queso is a smoother, creamier Mexican-inspired dip made with melted cheese and chili peppers.
This creamy chili cheese dip comes together with just five simple ingredients in under 30 minutes. Perfect for sharing at gatherings or enjoying as a snack, this recipe combines hearty canned chili, gooey cheddar cheese, and a few pantry staples to create a rich, crowd-pleasing dish.
What’s great about this dip is its versatility. While the classic version calls for canned chili, you can also make your own. Swap in homemade chili like No Bean Turkey Chili or Crock-Pot Vegetarian Chili to suit your dietary preferences. Whether you’re keeping it simple or adding your own twist, this dip is sure to become a favorite for any occasion.
Is Chili Cheese Dip Healthy?
While undeniably tasty, chili cheese dip isn’t the healthiest recipe. It contains a lot of saturated fat and tends to run a little high in sodium and cholesterol. For most people, this is a dish that should be enjoyed in moderation. On the bright side, chili cheese dip does have some protein, vitamin C, and calcium thanks to the meat, green chilis, and cheese. To further enhance the nutritional value, consider adding more vegetables like bell peppers and onions to the dip.
INGREDIENTS
- 8 ounces cream cheese, softened
- 4 ounces diced green chilis
- 15 ounces canned chili without beans
- 2 cups shredded cheddar cheese
- 1/4 cup green onions, chopped

INSTRUCTIONS
Prep
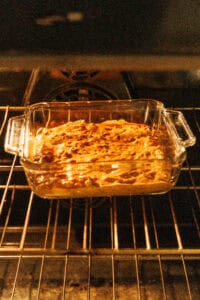
Preheat oven, mix cream cheese, chilis, half of cheese, and chili, prepare dish.
Bake
Bake until hot, and then top with remaining cheese and broil on low.
Garnish
Sprinkle green onions on top and enjoy!
Devour!

FAQs & Tips
Leftover chili cheese dip can be covered in the baking pan with foil or plastic wrap or moved to an airtight container. Either way, it will stay good in the fridge for 3 to 5 days and can be reheated in the oven for about 20 minutes at 350°F.
Most canned chili without beans contains thickeners, which is beneficial for a dip like this. You can use homemade chili if you want, although it can give this dip a thinner texture.
Other cheeses that melt well and would work here include pepper jack, Colby-Jack, and Monterey Jack. Feel free to add extra spices and seasonings, such as chili powder, smoked paprika, and cumin, to alter the flavor profile to your taste. You can also top the finished dip with a little fresh salsa or diced tomatoes.

Serving Suggestions
Chili cheese dip is best when served with tortilla chips. I would recommend making your own Air Fryer Tortilla Chips. You can also try it with Fried Tortilla Chips or Keto Tortilla Chips. If you enjoy a cocktail with your snacks, a Classic Margarita or perhaps a Spicy Margarita would be a great choice here. For something a little more fruity, try a Pomegranate Margarita or even a Watermelon Margarita.


Chili Cheese Dip
Ingredients
- 8 ounces cream cheese softened
- 4 ounces diced green chilis
- 15 ounces canned chili without beans
- 2 cups shredded cheddar cheese
- 1/4 cup green onions chopped
Instructions
-
Preheat the oven to 350°F.
-
In a mixing bowl, stir together the cream cheese, green chilis, and canned chili until well combined. Mix in 1 cup of shredded cheddar cheese.

-
Transfer the mixture to an 8×8-inch baking dish. Bake for 15 minutes or until the dip is heated through.
-
Top the mixture with the remaining 1 cup of shredded cheddar cheese and broil on low until the cheese is melted.
-
Top with fresh chopped green onions, and serve.


Nutrition
The post Chili Cheese Dip appeared first on Food Faith Fitness.